An Overview of the Customized Parts on My Paasche AB:
This is an old how-to I resurrected from two previous generations of rossmanart.com. It’s been informative to people in the past, and also explains a bit how I use this device.
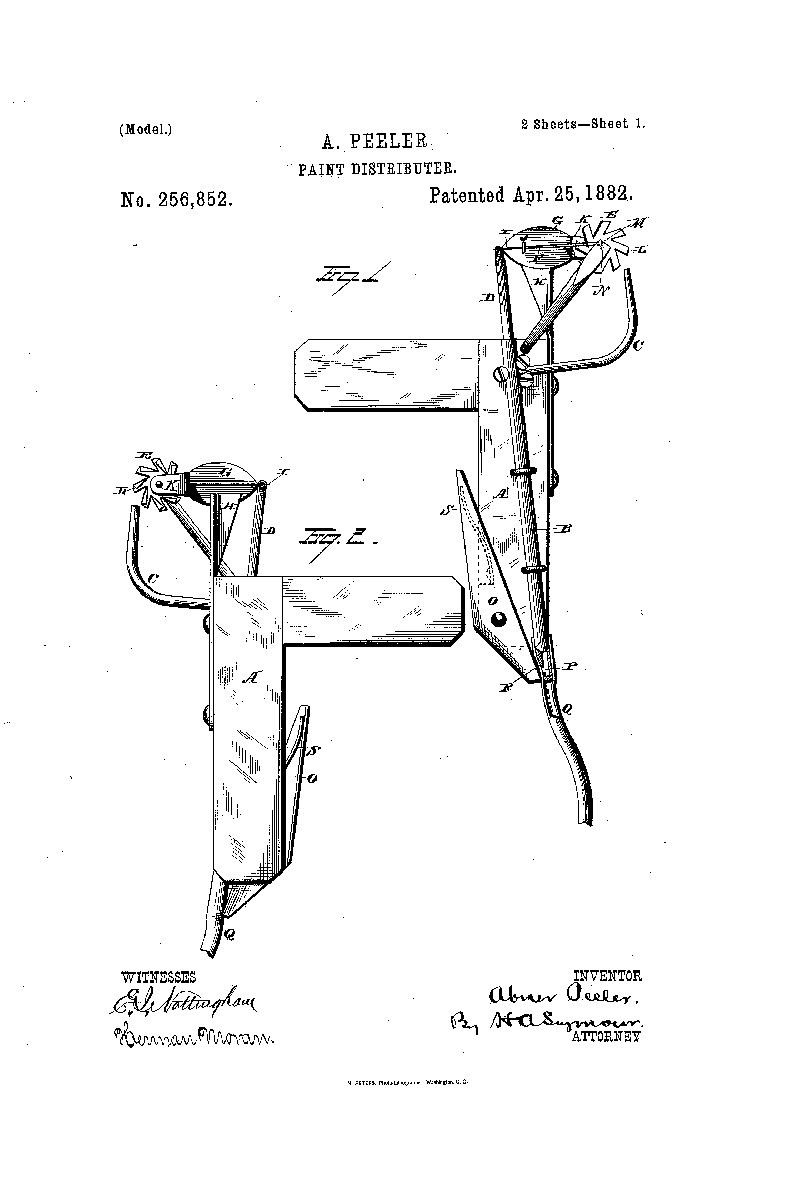 For those unfamiliar with turbine driven airbrushes, it all started over a century ago in 1879 with an invention by Abner Peeler called the Paint Distributor. This was a system that delivered paint into an airstream on the end of a reciprocating needle. Others developed Peeler’s original design into the lighter and smaller instrument seen here. Thanks to Jens Paasche, the modern AB made its debut in 1904, and little has changed with the version still produced today. Most airbrush designs opt for a simple linear mixing of paint and air, but a modern AB remains true to the original design of Peeler’s, and has few rivals when it comes to finely controlled paint dispersal. This is a testament to the genius of the AB’s design.
A normal AB has better control over paint flow than most other airbrushes, so why mess with it?*
The AB’s only flaw is its temperamental behavior due to the complexity of its moving parts. This is the reason I chose to modify my own AB. The three main controls , trigger, speed regulator, and stipple adjuster all need regular fine tuning to maintain top performance. Simply put, I wanted finer tuning and better performance, and was going to do whatever it took to get it. I started by making small changes to some of these control variables to fit the AB to my illustrative technique. The first thing that I changed was the long red stock AB handle. I replaced it with a much shorter rubber insert (an eye dropper bulb) seen at #4. Holding the AB this way felt more natural to me. Other modifications followed. Hopefully this tacit knowledge will inspire other AB users with a wish to tinker.
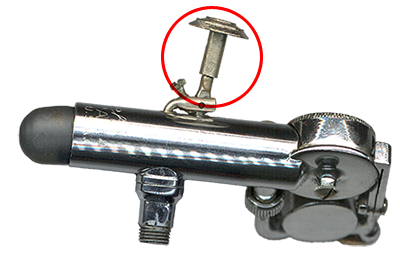
Customization Overview*
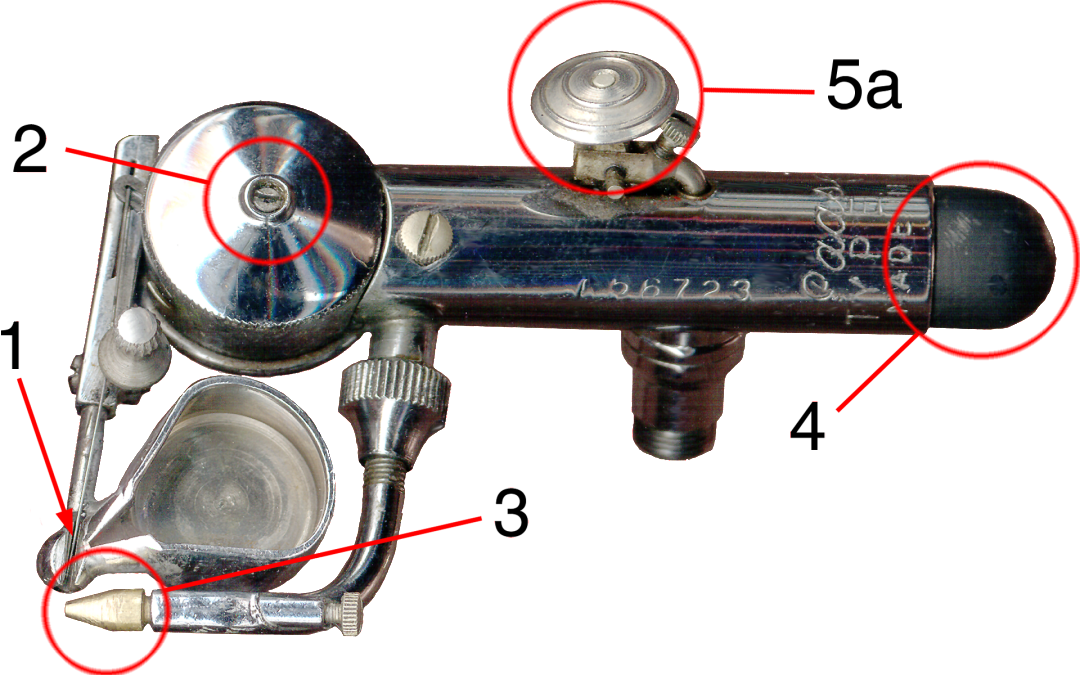
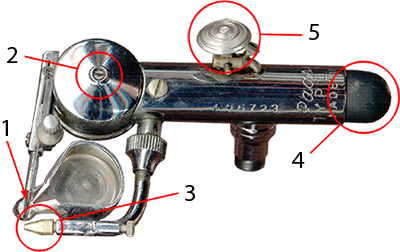
Here is a general overview of the five areas of my AB that I have customized for comfort and better performance . (1) A Sharpened needle tip to take advantage of the trigger’s precision control. (2) A Low profile grease cup screw (not shown) for comfort. (3) Custom blast jet to narrow the air blast for better performance with a sharper needle. (4) Shortened handle for comfort and easier handling. (5) Dual trigger assemblies: The short one, shown here for comparison. The longer one allows for finer needle control.
The Trigger Assembly*
I use this extended trigger assembly for better control when moving the needle in front of the blast jet. With a longer lever the thumb/finger must travel a greater distance to move the needle. This simple change is a borrowed trigger assembly from another Paasche V airbrush. It is very easy to switch between this and the original short trigger by tightening each assembly by hand. This allows for easy loosening and doesn’t strip the delicate brass threads. I rarely use the short trigger any more, so this one stays put.

Needle & Customized Blast Jet*
The combination of a smaller blast hole and sharpened needle is key to my AB’s performance enhancement. These two changes alone will significantly enhance a factory model AB. They are examples of what I term “the Maker mindset” – a DIY way of using existing tools to make better tools. My custom blast jet produces a stream of air about half the diameter of the factory supplied blast jet. I made it from a .125″ solid brass rod using a jewelers motor, sharpening stone, and micro drill bits. A tighter spray diameter coupled with a sharper needle produces a very thin line. The airbrush needle needs perfect alignment with the front of the blast hole for this to work. Also, I run the air pressure slightly higher than the recommended 25-35 PSI, but no more than 50 PSI to compensate for the narrower blast.
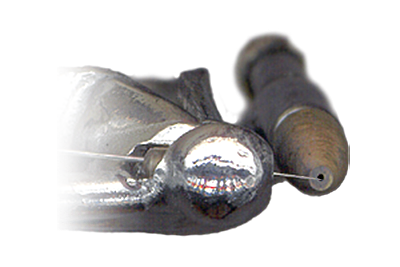
Front view of the customized blast jet*
This angle shows the sharpened needle extended in front of the custom blast jet. There is a narrow window of tolerance where the needle performs best in front of the blast jet. This is all fine tuned by adjusting the needle bend & sharpness, needle bearing, and angle of the paint cup. As long as there is little impact to the airbrush or damage to the needle or walking arm, these adjustments only need setting once until the needle needs replacement.

Sharpening a needle*
The taper on an original needle lengthens by sharpening its tip. This allows for greater control of the spray diameter over a greater distance of needle travel. This graphic shows the difference in a hairline spray diameter between a standard needle and a sharpened one. The red arrows indicate the area of increased performance. The dotted black arrows indicate the effective spray area along the needle. I use a sharpening stone with a jewelers motor to sharpen my needles. However, 1500-2000 grit sand paper also works well. I use this kind of sand paper often to polish and remove dried paint from my needles. This sharpening technique is also documented in “The Complete Manual of Airbrushing” by Peter Owen & Jane Rollason (now out of print, but available through Amazon). I highly recommend getting it if you own an AB.
Disclaimer:
*DO NOT modify your Paasche AB airbrush as described above if you don’t have experience maintaining it! Always consult the official AB instruction manual and parts list before attempting any adjustment or alteration to your AB!